Seven safe steps to scanner success
 Believe it or not, the laser scanner is 50-years-old. Sick invented the very first laser scanner and the technology has certainly advanced significantly since those early days, having an impact in particular on safety. Dr Martin Kidman, safety specialist at Sick UK, looks at some of these developments, and details seven steps to a successful safety installation.
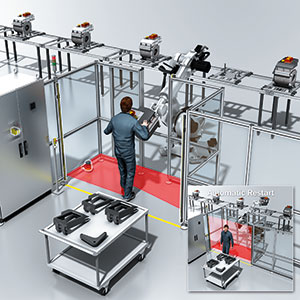
The laser scanner has led a quiet revolution in machinery safety because scanners reach the parts that other safety measures such as conventional fences and gates, safety mats or light curtains can’t, while allowing for maximum productivity and reduced stoppages e.g. by enabling a machine to slow down safely but keep operating when a person enters an outer protective field.
The safety laser scanner is a hugely versatile device that enables a rapid response to changing hazardous situations, whether as part of fixed machinery, or integrated into mobile vehicles such as AGVs, driverless forklifts, or service robots. Able to integrate with other safety devices, reach long protection ranges, and keep watch over several hazardous zones simultaneously, scanners mean machines stay available for longer and vehicles can deliver more or heavier loads in less time.
Innovations such as Safe HDDM (high definition distance measurement) can now reliably filter out the false signals tiggered by environmental conditions such as dust particles, weld sparks, insects or poor light conditions. The technology has even become stable enough to enable scanners to operate in a safety-rated application outdoors, for example using SICK’s outdoorScan3.
But, scanners are complex devices, and it’s all too easy to fall foul of some common pitfalls, so here are seven tips to avoid common mistakes to avoid along the way to a successful installation.
 1. Design in from the beginning

Bolting on a scanner only once a machine has been built and almost completely set up is all too common. Before too long, blind spots will be discovered and mechanical patches and even investment in more scanners to cover the area may be necessary.
If you know you are going to be using a safety laser scanner on your machine, design it in from the beginning. Think about blind zones, coverage, and the location of hazards surrounding the machine. It could save you a world of pain.
 2. Set correct multiple-sample values
Multiple sampling is a term to describe how many full scans are needed to detect an obtrusion in the safety field. In most cases the default, and the minimum, is to set the scanner to two scans. The higher the number of scans set, the less likely it will be that environmental conditions will cause false triggers. But, while multiple samples make detection more reliable and increase uptime, each additional scan essentially adds an ‘off-delay’ to the reaction time of the system, so the protective area may need to be bigger to give the scanner enough time to respond, otherwise a hazard could be created.
If you increase the multiple sampling, make a note of the safety laser scanner’s new response time, and adjust the minimum distance from the hazardous point accordingly. However, if the scanner is being used to implement the safety function ‘prevention of start-up’, the response time is not so important.
3. Specify the right protective field length
Specifying the protective field length is a ‘goldilocks’ decision – it should be as large as required, but as small as possible. Simply purchasing a scanner with the longest range may not be the best choice for your application. To achieve longer ranges, scanners need to be more sensitive, so both the scanning angle, and the detection robustness, could end up being sacrificed. You could increase the number of multiple samples and reduce the lack of angular resolution, but that will directly impact your response time and mean that larger protective fields are needed to compensate. Even though you bought a long-range scanner, you may end up buying more scanners to cover the area.
A shorter-range scanner may be more robust and a better choice, keeping response times down and reducing the footprint and cost, as well as eliminating annoying false trips.
4. Mount at the correct height
Either setting up the scanner at the wrong height, or configuring the resolution incorrectly, may mean that body parts are left undetected, and personnel may be exposed to a hazard. A safety laser scanner should be mounted so that it’s impossible for someone to crawl beneath, climb over or stand behind the protective fields.
If crawling under could create a hazardous situation, the safety laser scanner should not be mounted any higher than 300 mm. At this height, a resolution of up to 70 mm ensures that a worker’s leg will be detected.
Where the scanner needs to be mounted lower than 300mm, it is a common mistake to leave the resolution at 70mm, rather than reduce it to 50mm to make sure that a foot or leg continues to be detected by the laser beam. Reducing the resolution may also reduce the maximum protective field length, so it is advisable to check to ensure a safety-compliant system.
5. Consider the environment
Sometimes safety laser scanners just aren’t suitable for an application. There is a big difference between safety and availability, and expectations need to be realistic right from the start.
A scanner might trigger frequent trips where there is heavy dust, thick steam, excessive wood chippings, or even dandelions constantly in front of the field of view. Consider, what would happen when the scanner is not available and conduct a full assessment of the ambient conditions with proof tests if unsure.
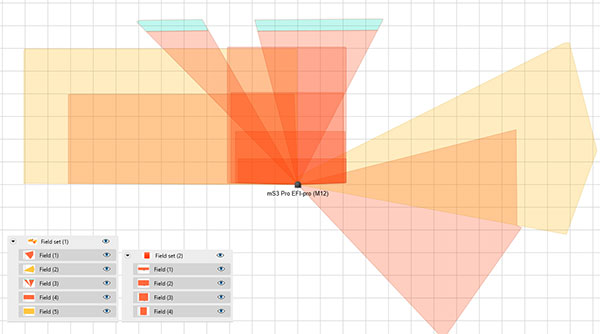
6. Configure safe switching of field sets
One of the great advantages of safety laser scanners is the ability to configure field sets, and store and select different fields. The safety function (as per EN ISO 13849/EN 62061) for selecting the field set should normally have the same safety robustness (PL/SIL) as the scanner itself, but sometimes, the safety of the mode selection is overlooked. For example, if a standard PLC or a single channel limit switch is used for selecting a field set, this would reduce the PL/SIL of the whole system to possibly PLc or even PLb.
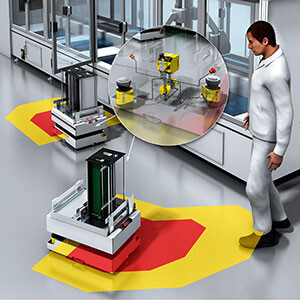
An incorrect selection of field set could mean that an AGV is operating with a small protective field in combination with a high speed and, hence, long stopping time, creating a hazardous situation.
7. Leave space close to perimeters
It would be easy to assume that a protective field should be drawn as close as possible to the perimeters of the area to be protected. However, the scanner is working at fast speeds and short time differences and therefore a statistical error must be taken into account. For example, for the Sick microScan3, we recommend that a space of approximately 65 mm is ensured, for example from a wall, to maximise availability. Scanners may well work ‘most of the time’ below these recommended values but will trip randomly. Check the tolerance ban of the scanner that you are intending to use, which can be up to 100 mm in some cases.
The aspiration of productive availability is the starting point for any well installed and easy-to-control safety installation. But, especially if you are new to the technology, then it is a good idea to contact the manufacturer for advice to avoid the potential for unsafe installations. Sick’s family of safety laser scanners offers a solution for every mobile and stationary application and we’re always ready to answer questions. We can also offer complementary support, engineering, safety concept and safety verification services.
Visit the Sick website for more information